|
|
|
|
 |
"United We Stand"
We Support Our Armed Forces,
Fire Fighters & Law Enforcement Agencies! |
 |
|
|
|
The EZ-Catalog™ is an easy way to add, edit and delete items you offer on your website. The EZ-Catalog allows you to use a shopping cart to display your items as well as creating a search page for those items.
Enter merchandise descriptions, stock numbers, and prices into EZ-Catalog™, and a database will automatically be created for customers to browse. Upload pictures into EZ-Catalog™, and your customers can preview your product. Quickly change prices or products at any time. You can also import data from an existing spreadsheet or database!
|
|
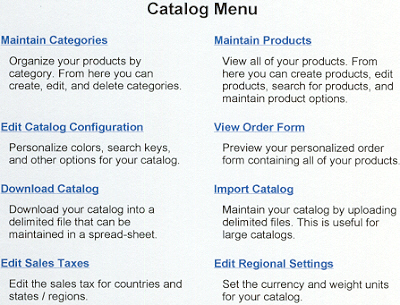
Maintain Categories: Organize your products by category. From here you can create, edit and delete categories.
Maintain Products: View all of your products. From here you can create products, edit products, search for products and maintain product options.
Edit Catalog Configuration: Personalize colors, search keys, and other options for your catalog.
View Order Form: Preview your personalized order form containing all of your products.
|
|
|
Download Catalog: Download your catalog into a delimited file that can be maintained in a spreed-sheet.
Import Catalog: Maintain your catalog by uploading delimited files. This is useful for large catalogs.
Edit Sales Taxes: Edit the sales tax for countries and states / regions.
Edit Regional Settings: Set the currency and weight units for your catalog.
Edit Order Form Comments: Edit the comments displayed on your order form.
|
|
|
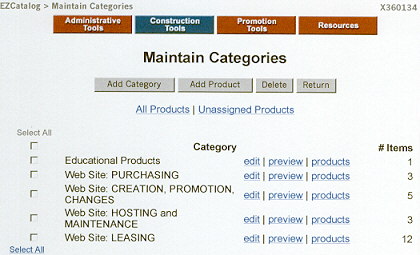
To help organize your products, the catalog enables you to create categories that separate and classify your products. In the Maintain Categories menu, you'll be able to help you manage your categories, add, delete, and even edit the look of individual categories.
|
|
Add Category: This option will allow you to add new categories and insert HTML pages as a header and footer.
Add Product: Click this button to add products directly to a specific category.
Delete: This will delete the category. When deleting categories, you are given the option of deleting its related products or leaving them in the catalog.
Return: The return button sends you back to your originating page.
|
|
|
|
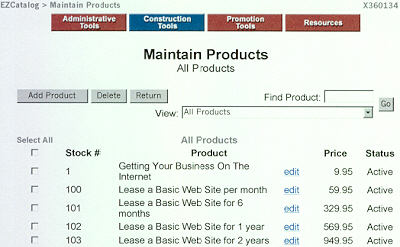
With the Maintain Products interface, you are able to view all of your products. From here you can create products, edit products, search for products, and maintain product options.
|
|
Add Product: To Add a new product to your catalog, click "Add Product."
Delete: Products can be deleted permanently from your catalog by turning on the checkbox to the left of the product and clicking "Delete". Checking the box for multiple products will delete many products at once.
Return: The return button sends you back to your originating page.
|
|
|
View: To view all of your products either click "All Products" from the Maintain Categories interface, or within the Maintain Products interface, select "All Products" from the drop-down menu and click "Go". The "All Products" view allows you to see a listing of all your products, regardless of what category they are in.
Find Product: The "Find Product View" shows the results of a Find Product search from the Maintain Products interface. To use the "Find Product" keyword search filter, type your search parameter in the "Find Product" field and click "Go".
|
|
|
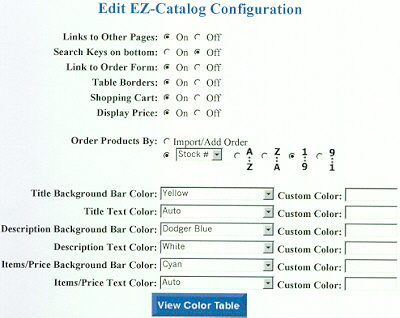
With the "Edit Configuration" option you find all of the configuration information for the catalog. You can set up your entire catalog to look the way you want. However, there is no option to change each page to different specifications. Every item and page will be displayed the same as you specify in Edit Configuration.
The first few radio buttons are for different options that can be shown on the catalog page.
|
|
Links to Other Pages: These are the "global links" at the bottom of each of your EZ-Net Tools™ pages. You can create these links by going to Edit Global Page Links. If you want to use these links to display at the bottom of your catalog pages, select "On", otherwise, select "Off."
Search Keys on bottom: The search keys are used to search the catalog from the "Search Catalog" page. If you want the search keys to display under each item, select "On," otherwise, select "Off."
Link to Order Form: If you would like your customers to have an option to link to the order form underneath every item, select "On," otherwise, select "Off".
|
|
|
Table Borders: Table borders can be set to border every item. Borders will give a very professional look to your catalog pages. If you would like table borders, select "On". However, if you would rather have just the information without borders, select "Off."
Shopping Cart: If you have the shopping cart enabled on your catalog page, then your customers can use the catalog page as an order form. If you select "On," then for every item, there will be a quantity option and an "Add to Shopping Cart" button to the right of it. This way, your customers can give the quantity of that item that they want to purchase. After adding it to their shopping cart, they can continue shopping in your catalog.
After deciding what options you want on and off, you can then move to the following:
Title Background Bar Color: This will change the background color for your title text. Select a web-safe color from the drop-down menu, or type your own color in the "Custom Color" field.
Title Text Color: This will change the text color for your title. Select a web-safe color from the drop-down menu, or type your own color in the "Custom Color" field.
Description Background Bar Color: This will change the background color for your description text. Select a web-safe color from the drop-down menu, or type your own color in the "Custom Color" field.
Description Text Color: This will change the text color for your description. Select a web-safe color from the drop-down menu, or type your own color in the "Custom Color" field.
Items/Price Background Bar Color: This will change the background color for your item information (price, stock number, etc.) Select a web-safe color from the drop-down menu, or type your own color in the "Custom Color" field.
|
|
Items/Price Text Color: This will change the text color for your item information (price, stock number, etc.) Select a web-safe color from the drop-down menu, or type your own color in the "Custom Color" field.
View Color Table: Just below these options you will find a "View Color Table" button. This button will display the colors we offer. Click on the "BACK" button of your browser to get out of the colors.
|
|
|
|
|
View Order Form: View your order form by clicking the "View Order Form" button on the EZ-Catalog menu. After you have added products to your catalog and edited the prices to your liking, you can view how your order form will appear to your customers. Clicking on "View Order Form" will take you away from your member tools, and is fully functional when you are directed to it from the EZ-Catalog menu.
|
|
Download Catalog: The "Download Catalog" will allow you to export all of your catalog items and categories to your computer. You may then open this catalog export file in a spreadsheet program.
When you click the "Download Catalog" button from the "EZ-Catalog Menu", you are directed to the following screen:
|
|
On this screen you are asked to set a field separator. By default the double ampersands (&&) are available.
However, you can use any form of separation. If you are not using any commas in the catalog, a single comma is the best way to separate the fields.
If you want to download the catalog with product options included, click the "Include product options" check box.
|
|
After choosing the field separator and clicking on the 'Create File' button, you see this screen:
On this screen you need to choose the "Download deliminated File". This will bring up the following window:
|
|
In this window, be sure to select the radio button that says "Save this file to disk". Then click on the "OK" button.
This will download the catalog to your computer. Be sure to save it somewhere safe and easy to find. You can then use most any spreadsheet program to open the file and edit the content. After making changes or adding to this information, you will need to use the EZ-Import function to import this catalog back into the system.
|
|
|
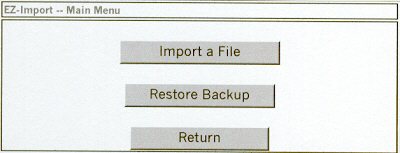
EZ-Import: Allows you to upload a previous export of your EZ-Catalog, or upload one you created from scratch using a compatible spreadsheet format.
|
|
|
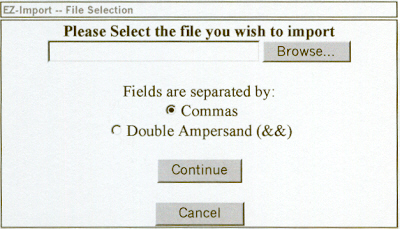
After you click on "Import a File." you will see a browse button next to an open field.
Click the browse button and choose the file off of your computer that has the .txt ending file.
If you double click on that file, or highlight it and then click open, the filename will be placed in the field next to the browse button.
Make sure that the radio button next to "Commas" or "Double Ampersand" is selected.
|
|
|
|
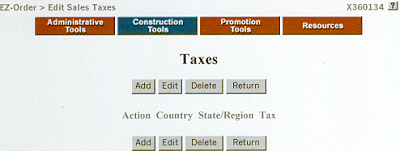
Edit Sales Taxes: With the "Edit Sales Tax" option, you will be able to charge for tax in different countries and states. The sales tax is applied when the "Ship To" area in EZ-Checkout is filled out. It can only be applied to the area that the item is shipped to. To add a sales tax, you must first have Ship-to Countries configured in your EZ-Shipping configuration. To configure tax for a region, click on the "Edit Sales Tax" button on the EZ-Catalog menu. You will be brought to the "Taxes" screen where you can Add, Edit, or Delete a sales tax.
|
|
|
Add: To add a sales tax, click on the "Add" button at either the top or the bottom of the listing. You will be brought to the "Add Tax" screen. Select the country that you want to add sales tax to by dropping down the menu. If you wish to add the same amount of tax for all countries and states, select the option "All". Once you select a country, click the "Submit" button. Next, select the specific state or providence for which you wish to add a tax. If you want to charge the same tax for all states or providences in this country, select "All". Now, type in the amount of sales tax that you want to charge in the box next to the "Tax:" field. Your tax will be added to the specified country and state. Click the "Submit" button to save your changes. If you wish to edit your country to another one, click the "Edit Country" button.
Edit: To edit a particular sales tax, select the radio button next to the sales tax you would like to edit and click the "Edit" button. Form here, you can edit the fields you would like to change. Click the "Submit" button when all your changes are finished.
Delete: To delete a sales tax, you must select the radio button next to the category that you want to delete and then click on the "Delete" button.
Return: This button will take you back to the EZ-Catalog Menu.
|
|
|
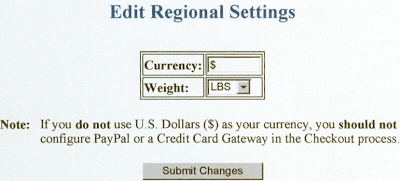
Edit Regional Settings: Regional settings allows you to change the symbol for currency that will appear on your order form, during product display, in your shopping cart, and during the checkout process. You can also determine the system of weights you use to calculate shipping and handling. If you use a system of currency other than dollars you should not enable any forms of online transactions. Our system only performs real-time transactions that support US dollars.
|
|
|
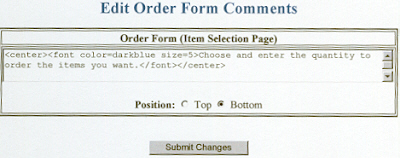
Edit Order Form Comments: Type in the text you would like to be displayed on your first Order Form page. Use the radio buttons to position your text above or below the product selection rows.
Click the "Submit Changes" button to save the changes made.
|
|
|
Special Note: We understand that making a product or service purchase online involves a great deal of trust on your part. We take this trust very seriously, and make it our highest priority to help ensure the security and confidentiality of the information you provide. EZ Website Builders uses industry-standard SSL (secure socket layer) technology to protect every interaction you have with the online ordering system. This protects your credit card and other personal information.
Once we receive your information, we not only store it behind a firewall, but also encrypt the sensitive payment information. When payment information is submitted through our online form, EZ Website Builders works with third-parties to verify and process your information. Neither EZ Website Builders nor our payment partners share or sell your personal information. The information you provide us will be used solely for the purpose for which it was provided.
|
|
|
|
|
|
|
|
|
|
|

